How to cook a goose
Last December we threw a holiday dinner party pot luck with some friends at which we were in charge of the main course. You always hear about the "Christmas goose" in Dickens and the like, but who has actually had goose? (sans buckshot...) None of us had. So, as it was viewed as a hands down success I thought I would share here how I prepared it.
Required:
- a goose. plucked and butchered. (where any desired organs are in a little sack stuffed inside)
- an oven capable of 400' F
- rubber gloves
- pliers
- trussing needle and heavy twine
- a "as big as you can find" stock pot
- a sharp paring knife
- a roasting rack
- a roasting pan. (disposable ok)
- if goose is frozen you'll need a cooler or bathtub too.
- salt and pepper
- 8-10 eaters of meat
- 4 hours, not counting thawing
Some things you should know: Geese are both serious athletes and water fowl. Given these facts they are pretty much all dark meat that is very lean. This meat is covered with a pretty substantial layer of fat. The removal of this fat during the cooking process is pretty much the secret to tasty goose.
So you can (somewhat suprisingly) find yourself a goose at the local supermarket. It's right there with the frozen turkeys and chickens wrapped in plastic. The Larry's market I got mine at had stocked up for the holidays but they carry them all year round. I think they even get some non-frozen ones in at the holidays. To thaw the frozen bird fill your cooler up with water about half way and put the goose, shrinkwrap and all, in the cooler overnight.
Four hours before mealtime put on your rubber gloves, remove your goose from the cooler, peel off the plastic and pat it dry with some paper towels. Start heating your oven up to 325' F at this time.
Grab your pliers and look for any remaining quills in the skin and pull them out. Pull back the skin on the neck opening and locate the wishbone. (it basically goes in a V around the opening) Scrape it with your knife until the bone is visible and then cut it away from the flesh.
Pull out the neck and the sac-o-organs and set them aside in case you want to make stock or gravy. Grab your knife again and cut away any of the globs of fat on the inside or around either opening.
Next pick up your trussing needle and prick the skin all over every couple inches taking care not to stick the meat, but to get into the fat. This is one of the key steps to tastiness. Don't skimp on the holes, the fat will drain out through these while cooking.
Fill your stock pot about half full with water and bring it to a boil. You are then going to dip the goose in the boiling water first one end and then the other. About a minute on each side, but you can tell when it's done because goose bumps will appear. This step gets rid of some of the fat, but also tightens up the skin making it easier for the fat to get out during roasting.
Pat the goose dry.
At this point the experts say to let it dry in your fridge for 24 hours, but I did not and it turned out fine.
Pack both ends with stuffing and sew them shut with your trussing needle and twine. The stuffing we used was apples, sage, carmelized onions, bacon and dried bread with some beaten eggs, salt and pepper.
Place the goose on your roasting rack in your roasting pan. If you are using a disposable pan put it all on a jellyroll pan for some stability. Make sure that your roasting rack holds the goose 2-3 inches above the bottom of the roasting pan. Pop it all in the oven and set your timer for an hour and a half.
90 minutes later, pull it all out and get rid of most of the fat in the pan trying not to disturb the brown bits on the bottom in case you want to make gravy. (wasn't really needed) Then roll the goose onto it's back and put it back in for another hour and 15 minutes.
75 minutes later, test the internal temperature. 170' F is cooked. At this point crank the oven up to 400' F and put the goose in for another 15 minutes. This is to crisp up the skin.
15 minutes later, take it out and let it rest for 30 minutes uncovered.
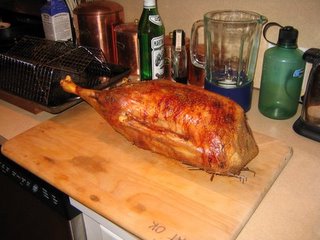
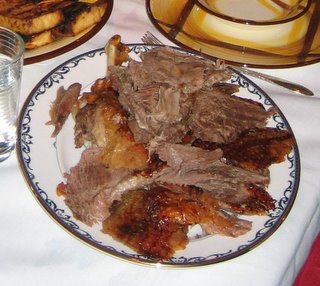
You goose is cooked! Remove stuffing, carve and plate.
Notice the crispy skin, and the dark meat in the photos below.


